လာလည္ၾကေသာမိတ္ေဆြမ်ားခ်မ္းသာကိုယ္စိတ္ျမဲပါေစ
Showing posts with label computer. Show all posts

Saturday, July 25, 2015

Saturday, July 25

CCleaner 5.08.5308 Business+Professional+Technican Edition+Crack (6.38 MB)

ကြန္ပ်ဴတာတုိင္းမွာ မရွိမျဖစ္ လုိအပ္တဲ႔ အရာေလးက  CCleaner  ပါ  ။ CCleaner  ကုိ စြဲျမဲ႕စြာ သုံးတတ္သူမ်ား အတြက္  CCleaner  ေနာက္ဆံုးထြက္ Update ေလးကိုတင္ေပးလိုက္ပါတယ္။ 
လုိအပ္သူမ်ား ရွာရလြယ္ေအာင္ ေဒါင္းရလြယ္လုိ႔  တင္ေပးလုိက္တာပါ ။
CCleaner 5.08.5308 INSTALLATION NOTES:
1. Run "ccsetup508.exe" complete installation.
2. DO NOT run the program and quit any running version from task manager.
3. In "DLL Files" folder, choose the desired version, and copy the files to installation directory
 "C:\Program Files\CCleaner"
or, "C:\Program Files (x86)\CCleaner"
4. Start the program.
5. Register with the following information (if required):
 ******************************************
 * Name:  Registered User   *
 * License Key: CBB4-FJN4-EPC6-G5P6-QT4C *
 ******************************************
6. Start the program and enjoy!!
                                    Clik and Download 
                               www.linmss.org

Tuesday, May 12, 2015

MOBILedit!
ေဆာ့ဖ္၀ဲအမ်ိဳးအစား - Mobile Device Manager
ဗားရွင္း - 7.8.3.6076
ဖိုင္အရြယ္အစား - 31.197 MB
အသံုးျပဳႏိုင္သည့္ OS -Windows 2000/XP/Vista/7/8
MOBILedit ဆိုတဲ့ေဆာ့ဖ္ဝဲဟာ Android OS အသံုးျပဳထားေသာမိုဘိုင္းဖုန္း၊ Tablet ေတြကို PC နဲ႔ ခ်ိတ္ဆက္တဲ့အခါမွာ Manage ျပဳလုပ္ႏိုင္မယ့္ ေဆာ့ဖ္ဝဲ တစ္ခု ျဖစ္ပါ တယ္။ ဖုန္းနဲ႔ခ်ိတ္ဆက္တဲ့အခါမွာ Internal Stroage ကို အသံုးျပဳမွာလား၊ Data ကို အသံုးျပဳမွာလားဆိုတာအျပင္ Sim Card Reader အေနနဲ႔ပါ အသံုးျပဳႏိုင္ေစဖို႔အတြက္ စီစဥ္ဖန္တီးေပးထားတာကို ေတြ႕ျမင္ရမွာ ျဖစ္ပါတယ္။ ဒါ့အျပင္ ခ်ိတ္ဆက္မႈေတြအတြက္လည္း Cable, WiFi အစရွိတာေတြအျပင္ Bluetooth နဲ႔ ခ်ိတ္ဆက္ႏိုင္ဖို႔ အတြက္လည္း စီစဥ္ေပးထားတာကို ေတြ႕ျမင္ရမွာ ျဖစ္ပါတယ္။ မိုဘိုင္းဖုန္းေတြ အတြက္ PC Sucite အေနနဲ႔ အသံုးျပဳႏိုင္မယ့္ ေဆာ့ဖ္ဝဲတစ္ခု ျဖစ္ပါတယ္။

Thursday, May 7, 2015

Connectify Hotspot 2015.0.4.34734 + Crack (Full)

မိမိကြန္ျပဴ တာကေန WiFi ျပန္ရွယ္ခ်င္သူေတြအတြက္ Full ေလးပါ။အင္စေတာ
လုပ္နည္းကေတာ့ေဒါင္းေလာ့စ္ဖိုင္ထဲမွေဆာ့စ္၀ဲကိုအင္စေတာလုပ္ျပီးတာနဲ႔
taskbar သူရဲ႕ icon ေလးေပၚေနရင္ညာဘက္ကလစ္ႏွိပ္ျပီး Exit ကိုႏွိပ္လိုက္
ပါ။ျပီးရင္ crack ဖိုင္ထဲမွာရွိေနတဲ့ “connectify.exe” ကို copy လုပ္ျပီးအင္စေတာ
လုပ္ထားတဲ့သူ႕ရဲ႔ဖိုင္တည္ရွိရာ “C:\Program Files\Connectify” ထဲမွာ
paste လုပ္လိုက္ပါ။အားလံုးျပီးသြားရင္စက္ကိုပိတ္ျပီးျပန္ဖြင့္လိုက္ပါ။ဒါဆိုရင္
Full အျဖစ္နဲ႔လုပ္ပိုင္ခြင့္ေတြအျပည့္အ၀ရပါမယ္။အင္စေတာလုပ္နည္းဖိုင္ထဲမွာ
အရင္ဖတ္ပါ။


{ Unicode }
မိမိကွန်ပြူ တာကနေ WiFi ပြန်ရှယ်ချင်သူတွေအတွက် Full လေးပါ။အင်စတော
လုပ်နည်းကတော့ဒေါင်းလော့စ်ဖိုင်ထဲမှဆော့စ်ဝဲကိုအင်စတောလုပ်ပြီးတာနဲ့
taskbar သူရဲ့ icon လေးပေါ်နေရင်ညာဘက်ကလစ်နှိပ်ပြီး Exit ကိုနှိပ်လိုက်
ပါ။ပြီးရင် crack ဖိုင်ထဲမှာရှိနေတဲ့ “connectify.exe” ကို copy လုပ်ပြီးအင်စတော
လုပ်ထားတဲ့သူ့ရဲ့ဖိုင်တည်ရှိရာ “C:\Program Files\Connectify” ထဲမှာ
paste လုပ်လိုက်ပါ။အားလုံးပြီးသွားရင်စက်ကိုပိတ်ပြီးပြန်ဖွင့်လိုက်ပါ။ဒါဆိုရင်
Full အဖြစ်နဲ့လုပ်ပိုင်ခွင့်တွေအပြည့်အဝရပါမယ်။အင်စတောလုပ်နည်းဖိုင်ထဲမှာ
အရင်ဖတ်ပါ။


Connectify Hotspot

Connectify Hotspot lets you share your computer’s Internet connection with other devices over Wi-Fi. Works with any Internet connection including Wi-Fi, Ethernet, cable, DSL, 3G, 4G, even tethered cellphones! As long as your computer is online, your other nearby devices – and friends and colleagues – will be, too.

Share any Connection with any Device

Got a 3G or 4G adapter for your laptop? How about a tethering plan for your mobile phone? With Connectify Hotspot PRO, all your other Wi-Fi enabled devices can use those connections too. Gain all the benefits of a travel router right inside your PC and start sharing the Internet with tablets, media players, e-readers, other laptops – you name it.

Drag and Drop to Share Files

Direct Download Link


Connectify Hotspot’s Fling feature lets you easily send any file from one device to another within Wi-Fi range. Stop emailing files to yourself and passing USB drives. You don’t even need an Internet connection. Even works with mobile phones.

Connectify Dispatch is an easy-to-use software load balancer that lets you use from all your computer’s Internet connections at the same time. Got Wi-Fi AND 4G? Two Wi-Fi adapters? Ethernet AND 3G? Connectify Dispatch will work with any and all of these technologies to increase your bandwidth.

Torrential Torrents, Whirlwind Web

Connectify Dispatch is particularly well-suited for activities that involve downloading multiple files such as BitTorrent and web browsing. While a single large stream like Netflix can’t be split across multiple Internet connections with Connectify Dispatch, it will be assigned to the fastest one while other requests will be intelligently routed to other connections.

Use Data, not Dollars

With Connectify Dispatch’s metered connections you can avoid costly overages by assigning bandwidth caps to your expensive 3G and 4G connections. Additionally, by setting their Priority level to Backup, Connectify Dispatch will only route traffic through them if your Primary connections fail. Fast, smart, AND frugal.

Credits to “CodeCracker”

How to Activate ?

*Download the setup and crack
*Install the setup throughout and reboot your PC
*Exit the setup from taskbar or using task manager
*Now copy and paste the cracked “connectify.exe” file from the cracked folder to installation directory which is default “C:\Program Files\Connectify”.
*That’s it. Start using latest version of connectify without any issue
*Enjoy ! :)


Click to Download Below (ေအာက္မွာေဒါင္းပါ)


Internet Download Manager (IDM) 6.23 Build 11 + Crack Fix

အခုတေလာ (IDM) 6.23 Build 11  မွာခဏဏကီးေတာင္းတဲ့ေဘာက္ေလး
တက္လာသူေတြအတြက္အရင္အေဟာင္းကိုထုတ္ျပီးဒီေကာင္ေလးကိုအသံုး
ျပဳပါ။က်ြန္ေတာ္ဒီေကာင္ေလးကိုသြင္းၾကည့္တာအဆင္ေျပပါတယ္။ဘာေဘာက္
မွတက္လာျခင္းမရွိေတာ့ပါဘူး။အင္စေတာလုပ္နည္းကေတာ့အရင္အတိုင္းပါပဲ။
ဆိုဒ္ရဲ႕ညာဘက္ျခမ္းေအာက္မွာ Movie နဲ႔ရွင္းျပထားပါတယ္။အင္စေတာ
လုပ္နည္းကိုဖိုင္ထဲမွာအရင္ဖတ္ပါ။


Description:
Internet Download Manager 6.23 (IDM) is a reliabe and very useful tool with safe multipart downloading technology to accelerate from internet your downloads such a video, music, games, documents and other important stuff for you files. IDM has a smart download logic accelerator and increases download speeds by up to 5 times, resumes and schedules downloads. Comprehensive error recovery and resume capability will restart broken or interrupted downloads due to lost connections, network problems, computer shutdowns, or unexpected power outages. Simple graphic user interface makes Internet Download Manager user friendly and easy to use. Unlike other download managers and accelerators, IDM segments downloaded files dynamically during download process and reuses available connections without additional connect and login stages to achieve best acceleration performance.


Features:
• Internet Download Manager supports all popular browsers including Microsoft Internet Explorer, Netscape, MSN Explorer, AOL, Opera, Mozilla Firefox, Avant Browser, and it can be integrated into any Internet application to take over downloads using unique “Advanced Browser Integration” feature.
• Dynamic Segmentation and Performance.
• Easy downloading with one click. When you click on a download link in a browser, IDM will take over the download and accelerate it. IDM supports HTTP, FTP, HTTPS and MMS protocols.
• Download Speed Acceleration. IDM can accelerate downloads by up to 5 times due to its intelligent dynamic file segmentation technology.
• Download Resume. Internet Download Manager will resume unfinished download from the place where they left off.
• YouTube grabber. IDM can grab FLV videos from popular sites like YouTube, MySpaceTV, and Google Video.
• Drag and Drop. You may simply drag and drop links to IDM, and drag and drop downloaded files out of Internet Download Manager.
• Automatic Antivirus checking. Antivirus checking makes your downloads free from viruses and trojans.
• Advanced Browser Integration. When enabled, the feature can be used to catch any download from any application.
• Built-in Scheduler. IDM can connect to the Internet at a set time, download the files you want, disconnect, or shut down your computer when it’s done.
• IDM includes web site spider and grabber. IDM downloads all required files that are specified with filters from web sites, for example all pictures from a web site, or subsets of web sites, or complete web sites for offline browsing. It’s possible to schedule multiple grabber projects to run them once at a specified time, stop them at a specified time, or run periodically to synchronize changes.
• IDM supports many types of proxy servers. For example, IDM works with Microsoft ISA, and FTP proxy servers.
• IDM supports main authentication protocols: Basic, Negotiate, NTLM, and Keberos. Thus IDM can access many Internet and proxy servers using login name and password.
• Download All feature. IDM can add all downloads linked to the current page. It’s easy to download multiple files with this feature.
• Download Categories. IDM can be used to organize downloads automatically using defined download categories.
• Download limits. Progressive downloading with quotas feature. The feature is useful for connections that use some kind of fair access policy (or FAP) like Direcway, Direct PC, Hughes, etc.
• Internet Download Manager is multilingual.


What's New in This Release?
* Fixed problems with erroneous interceptions of Firefox internal downloads
* Improved Google Chrome integration


Requirements:
OS: Windows All


Install Notes:
==> Install Program
==> When Finish Installation, Close "Tray Icon" From Taskbar
==> Copy & Replace Crack In to Default Install Directory
==> Double click on "Key.reg",Then click on yes to Active your License.
==> Enjoy ...


Tuesday, May 5, 2015

♪ ပီစီမွ အင္တာနက္ ဆက္သြယ္မႈကို Android စမတ္ဖုန္းတြင္ အသံုးျပဳနည္း ♫

1
မ်ားေသာအားျဖင့္ေတာ့ Android Phone မွ အင္တာနက္ ဆက္သြယ္မႈကို ပီစီမ်ားမွာ ရယူအသံုးျပဳေလ့ရွိပါတယ္။ ဒါကို Tether လုပ္တယ္လို႔ ေခၚပါတယ္။ ဒါေပမယ့္လည္း ပီစီမွ အင္တာနက္ ဆက္သြယ္မႈကို ဖုန္းမွာ အသံုးျပဳခ်င္ရင္ Reverse Tether ျပဳလုပ္ႏုိင္ပါတယ္။

ဒီလိုလုပ္ဖို႔ နည္းလမ္းမ်ားစြာ ရွိပါတယ္။ WiFi Hotspot, Bluetooth, USB Cable နည္းလမ္းမ်ား ျဖစ္ပါတယ္။ ဒီနည္းလမ္းမ်ားက သင့္ဖုန္းမွ Mobile Data ကို ေခြ်တာခ်င္ရင္ ဒါမွမဟုတ္ သင့္ဖုန္းမွာ အင္တာနက္ မရရွိဘဲ ပီစီမွ အင္တာနက္ကို အသံုးျပဳခ်င္ရင္ အသံုး၀င္မွာ ျဖစ္ပါတယ္။

WiFi Access Point
အလြယ္ဆံုးနည္းကေတာ့ ပီစီမွာ WiFi Hotspot တစ္ခုျပဳလုပ္တာ ျဖစ္ပါတယ္။ ဒီလိုလုပ္ဖို႔အတြက္ ပီစီမွာ WiFi Hardware လိုအပ္ပါတယ္။ Laptop မ်ားမွာတာ့ WiFi Hardware ပါရွိေလ့ရွိပါတယ္။ WiFi Hardware မပါတဲ့ ပီစီေတြအတြက္ေတာ့ USB-to-WiFi adapter ကို အသံုးျပဳႏုိင္ပါတယ္။
Android Phone နဲ႔ Tablet ေတြက ad-hoc network ကို အေထာက္အပံ့ေပးျခင္း မရွိပါဘူး။ ဒါေပမယ့္ Virtual Router Software ကို အသံုးျပဳၿပီး WiFi Hotspot တစ္ခုဖန္တီးႏုိင္ပါတယ္။ Android Device ေတြက အဲဒီ WiFi Hotspot ကို ခ်ိတ္ဆက္ႏုိင္ၾကပါတယ္။

1

Virtual Router ကို ေအာက္ပါ လင့္ကေန ရယူႏုိင္ပါတယ္။
http://goo.gl/lKRcPS

Bluetooth PAN
Bluetooth ဆက္သြယ္မႈကို အသံုးျပဳၿပီးလည္း အင္တာနက္ဆက္သြယ္မႈကို မွ်ေ၀ႏုိင္ပါတယ္။ သင့္ရဲ႕ Android Phone, Tablet ဟာ Android 4.0 နဲ႔ အထက္ရွိဖို႔ လိုအပ္ပါတယ္။ ဖုန္းမွာ Bluetooth ဖြင့္ပါ။
ပီစီမွာ Bluetooth PAN ( Personal Area Network) ကို ဖြင့္ဖုိ႔အတြက္
၁။ Control Panel ထဲသြားၿပီး Search Box မွာ Adapter လို႔ရိုက္ပါ။ Network and Sharing Center ေအာက္မွ View network connections ကို ႏွိပ္ပါ။
၂။ Personal Area Network ေအာက္မွ Bluetooth Network Connections ကိုႏွိပ္ပါ။
၃။ Toolbar ေပၚမွ View Bluetooth network devices ကို ႏွိပ္ပါ။
၄။ Bluetooth Personal Area Network Devices dialog box ထဲမွ Bluetooth devices ေအာက္မွာ သင္ခ်ိတ္ဆက္ခ်င္တဲ့ စမတ္ဖုန္းကို တစ္ခ်က္ႏွိပ္ၿပီး Connect ကို ႏွိပ္ပါ။

WiFi ဆက္သြယ္မႈဟာ Bluetooth ထက္ ျမန္ဆန္တဲ့အတြက္ ေဖာ္ျပၿပီးတဲ့ နည္းလမ္းႏွစ္ခုမွာ WiFi Hotspot ျပဳလုပ္ၿပီး အင္တာနက္ ဆက္သြယ္မႈ မွ်ေ၀တဲ့ နည္းလမ္းကို အသံုးျပဳသင့္ပါတယ္။

USB Cable ( Root Only )
USB ႀကိဳးကေနတစ္ဆင့္ ပီစီမွ အင္တာနက္ ဆက္သြယ္မႈကို ဖုန္းထံ မွ်ေ၀ႏုိင္ပါတယ္။ ဖုန္းဟာ Root လုပ္ထားဖို႔လိုသလို Settings>Development ထဲမွ USB Debugging ကို On ထားရမွာပါ။ ပီစီမွာ အသံုးျပဳရမယ့္ Android Reverse Tethering Tool ကို ေအာက္ပါ လင့္မွ ရယူပါ။
http://goo.gl/tXlG5a

Software ကို အင္စေတာလုပ္ၿပီးရင္ ဖုန္းကို ပီစီနဲ႔ USB ႀကိဳးမွတစ္ဆင့္ ခ်ိတ္ဆက္ပါ။ Select a device မွာ သင့္ရဲ႕ ဖုန္းကို ေရြးေပးၿပီး Connect ခလုတ္ကို ႏွိပ္ပါ။ ဒါဆိုရင္ ဖုန္းမွာ လိုအပ္တဲ့ Apps ႏွစ္ခုျဖစ္တဲ့ Busybox နဲ႔ Redsocks တို႔ကို ထည့္သြင္းေပးမွာပါ။

2

ဒါဆိုရင္ ပီစီမွ အင္တာနက္ ဆက္သြယ္မႈကို ဖုန္းမွာ အသံုးျပဳႏုိင္ပါၿပီ။

Tuesday, April 28, 2015

Any Video Converter Ultimate 5.8.0 Portable With Keygen Full Version Size(44MB)


Video ေတြကို Convert  လုပ္ႏိုင္တဲ့ Any Video Converter Ultimate ေဆာ့ဝဲလ္ကိုတင္ေပးလိုက္ပါတယ္ ဒီေဆာ့ဝဲလ္ေလးကေတာ့ Video To Convert DVD,
Video To Convert CD, DVD Menus တို႔ကိုလုပ္ႏိုင္ပါတယ္ ဖုန္းမ်ားအတြက္ လည္း ဗီဒီယိုမ်ားကို ေျပာင္းလဲႏိုင္ပါသည္။


Password ေတာင္းလာပါက  www.aungkyawthu.net   ကိုထည့္ေပးပါ
ေက်းဇူးတင္ပါတယ္။

Monday, April 27, 2015

Computerမွာ Virus အကိုက္ခံထားရျခင္း ရွိမရွိ စစ္ေဆးျခင္း


Antivirus Software တင္မထားမိလို႔ မစိုးရိမ္ပါနဲ႔။Software မရွိဘဲ စစ္တဲ့ နည္းေတြ ေတာ္ေတာ္မ်ားမ်ား

ရွိပါတယ္။

အရင္ဆံုး စစ္သင့္တာက….
• Tools Menu က Folder Options ေပ်ာက္ေန ပါသလား။


• Command Prompt, Registry, Task Manager ကို၀င္တိုင္းကြန္ပ်ဴတာ Restart က်သြားပါသလား။


• Administrator Account ျဖစ္ရဲ့ သားနဲ႔Registry Editor, Task Manager ဖြင့္မရ ျဖစ္ေနပါသလား။


• Hidden Files, Hidden System Files ေတြကို ေဖာ္မရျဖစ္ေနပါသလား။


• Folder ေတြကုိ Double Click ႏွိပ္လိုက္တိုင္း My Documents Folder ပဲ ေပၚေနသလား၊ ဒါမွမဟုတ္ Folder လည္း မပြင့္ ဘာမွ်လည္း တက္မလာျဖစ္ေနပါသလား။


• Memory Stick ရဲ့ Drive ေပၚမွာ Right Click ႏွိပ္လိုက္ရင္ Open က ထိပ္ဆံုး ေရာက္ေနမယ့္ အစား Autoplay က ထိပ္ဆံုး ေရာက္ေနပါသလား။


• Drive ေတြ၊ Memory Stick ေတြကို double Click ႏွိပ္လိုက္တိုင္း Open With Boxပဲ ေပၚ ေနပါသလား။


• Memory Stick ထဲက Folder ေတြေပၚမွာ Right Click ႏွိပ္ၿပီး Properties ကိုေရြးရင္ Type မွာ File Folder လို႔ ေပၚမယ့္အစား Application လို႔ ေပၚေနပါသလား။


• My Folder ဆိုတဲ့ Folder ေအာက္မွာ My Folder.exe ကို ေတြ ႔ ေနရပါသလား။ (ဆိုလိုသည္မွာ Folder ၏ နာမည္ႏွင့္ တူေသာ exe ၀င္ေရာက္ ေနပါသလား။)


• Task Manager ကို ဖြင့္ပါ။ (Ctrl + Alt + Del) Flashy, Fun, NewFolder စတဲ့ Process ေတြ Run ေနသလား ၾကည့္ပါ။ ( Run ေနတယ္ ဆိုရင္ ဘယ္ Memory Stick မွ မတတ္္ပါႏွင့္။ Virus ခ်က္ခ်င္း ကူးဆက္ ခံရႏိုင္ပါတယ္။ Stick ကို Formatခ်လည္း အပိုပါပဲ။ ကိုယ္ကို Format ခ်ၿပီးတာနဲ႔ Virus ကျပန္၀င္ႏိုင္ပါတယ္။ )


အထက္ပါ အခ်က္ေတြထဲက တစ္ခုခု ခင္ဗ်ားစက္မွာ ျဖစ္ေနျပီဆိုရင္ ေသခ်ာသေလာက္နီးပါး Virus သို႕မဟုတ္ trojan သို႕မဟုတ္ spyware တစ္ခုခု စက္ထဲမွာရွိေနျပီလုိ႕ ယူဆနိုင္ပါတယ္။ အျခား စစ္ေဆးနည္းေတြလည္း အမ်ားၾကီးရွိပါေသးတယ္။
Ref : http://www.aungkomobile.com

ကလစ္ ႏွစ္ခ်က္နဲ႔ Full Versin အျဖစ္ အျမဲသံုးႏိုင္မဲ့ Internet Download Manager 6.23 Build 11 (Latest Version)

ေနာက္ဆံုးထြက္ IDM ပါ.... Patch,Crack မသံုးတတ္တဲ႔ မိတ္ေဆြမ်ားအတြက္ ျပန္လည္မွ်ေဝေပးလိုက္ပါတယ္..
ဒီ Version ကို အသံုးျပဳမယ္ဆိုရင္ေတာ့ အရင္ ရွိျပီးသား IDM ကို Uninstall လုပ္ပစ္ပါ... 
စက္ကို Restart ခ်ေပးလိုက္ပါ ... 
 ျပီးမွ ခုေဒါင္းထားတဲ႔  IDM 6.23 B11 FUll CraCked - www.winkabarkyaw.net.exe  ဖိုင္လ္ကို ကလစ္ႏွစ္ခ်က္နဲ႔ Install လုပ္ေပးလိုက္ပါ...။ သူ႕ဖာသာသူ Install လုပ္သြားပါလိမ့္မယ္...။
အဆင္ေျပပါေစ...


How to install IDM 6.23 B11?

1-Uninstall old version – reboot your Windows.
2-Unrar and run exe file (Run as administrator).
3-Have fun! and share it with your friends.


www.winkabarkyaw.net

♪ ေပ်ာက္ပ်က္သြားတဲ့ ဓါတ္ပံုမ်ားကိုျပန္ယူေပးနိုင္တဲ့ - Easy Photo Recovery v6.11 Build 1024 + Key ♫

imge

အေၾကာင္းအမ်ိဳးမ်ိဳးေၾကာင္း ဓါတ္ပံုေတြေတြကိုမွားဖ်က္မိၾကပါလိမ့္မယ္။ ဒါမွမဟုတ္လည္း Error တစ္ခုခု ၿဖစ္ျပီး ဓါတ္ပံုေတြေပ်ာက္ဆံုးသြားပါလိမ့္မယ္။ အဲ့ဒီအတြက္ ေပ်ာက္ဆံုးပ်က္စီးသြားတဲ့ ဓါတ္ပံုမ်ားကို ျပန္ လည္ရယူေပးနိုင္တဲ့ Easy Photo Recovery ဆိုတဲ့ Software ေလးကိုအသံုးျပဳျပီး ျပန္လည္ရယူနိုင္ပါျပီ ဗ်ာ။ Computer မွာ Install လုပ္ျပီးအသံုးျပဳရမွာပါေနာ္။ ဖုန္းမွာသံုးရမွာနဲ႕မွားေနၾကမွာစိုးလို႕ပါ။ ကြန္ျပဴတာ မွာပ်က္စီးေပ်ာက္ဆံုးသြားတဲ့ ဓါတ္ပံုမ်ားကိုရယူေပးနိုင္ရံုတင္မကပါဘူး အျခားေသာ Devices မ်ားျဖစ္တဲ့ Camera , Phone , External Hard Disk , Memory Card , အစရွိတဲ့ Device မ်ားမွ ပံုမ်ားကိုလည္း ျပန္ လည္ရယူေပးနိုင္ပါတယ္ဗ်ာ။ ေပ်ာက္ဆံုးသြားသမွ်ပံုမ်ားအားလံုးကို ရယူနိုင္တယ္လိုု႕ေတာ့အာမမခံရဲပါဘူး ဗ်ာ။ ဒါေပမယ့္ % ေတာ္ေတာ္မ်ားမ်ားကိုေတာ့ ျပန္လည္ယူေပးနိုင္ပါလိမ့္မယ္ဗ်ာ။ အျမဲတမ္းအသံုးျပဳနိုင္ဖို႕ အတြက္ Full Version အေနနဲ႕ Key  ကိုထည့္ေပးထားပါတယ္ဗ်ာ။ အေသးစိတ္ကိုေတာ့ ေအာက္မွာဆက္ လက္ေလ့လာနိုင္ပါတယ္ဗ်ာ။


Easy Photo Recovery guarantees safety of your photos and videos. Modern digital cameras and flash cards allow rewriting photo and video files many times and sometimes important files can be deleted or lost by mistake. The program will help you to restore deleted or unreadable photos and videos at once. Easy Photo Recovery recovers photos and video from various media storage devices, such as digital cameras, hard drives, mobile phones and all types of flash cards like CompactFlash (type I/II), IBM Microdrives, SmartMedia, MultiMedia (MMCs), Secure Digital (SD), SONY Memory Stick and others. 
The program recovers files from damaged flash cards and even after formatting the media storage device. Like no other recovery tool, Easy Photo Recovery is easy in use, has a clear interface and detailed documentation. Featuring a step-by-step interface, it will guide you through several stages of data recovery. All you have to do is just make a few mouse clicks. First select the files that you need to recover and choose the disk and the folder where the files should be saved. Then click the "Start" button and wait till the disk scanning is over. You will get your lost photos or video back in seconds. All recovered files will be kept in the selected folder. Easy Photo Recovery is designed not only for digital camera enthusiast, but also professional photographers as well. It will be helpful in photo studios and digital photo printing services. Its numerous awards prove that the program is one of the best in its class.
Program features:
- Allows previewing photos before recovery;
- Performs sector-wise search of deleted files;
- Supports any photo and video file format;
- Ensures high probability of recovery;
- Offers 20 different interface languages;
- Features a simple step-by-step interface and detailed documentation;
- Supports all Microsoft Windows platforms;
- Provides professional-quality results;
- And much more...
Version 6.11 (2015-04-23)
+ Support of exFAT implemented
+ New language files (Czech, Turkish, Polish)
- Corrections and bug fixes

**  Step-1.ေအာက္က Download Button ကိုႏွိပ္လိုက္ပါ
**  Step-2. "5sec". ေလာက္ေစာင္႕ေပးပါ။

**  Step-3. "  << SKIP AD >>   ".ကိုႏွိပ္ေပးပါ။
**  Step-4. Download Link က်လာပါလိမ္႕မယ္။
**  အဆင္ေျပပါေစဗ်ာ။

   Download

Saturday, February 28, 2015

IDM 6.23 Build 2 Full Patch, Crack, Serial Full Version Size(7.1MB)

အသစ္ေတြကိုမွၾကိဳက္တဲ့သူေတြအတြက္ IDM 6.23 Build 2 ထြက္လာလို႔အသစ္တင္ေပးလိုက္ပါတယ္ခင္ဗ်ာ။ကြန္ပ်ဴတာေတြမွာေဒါင္းလုပ္ဆြဲယူရန္
မရွိမျဖစ္လိုအပ္ေဆာ့ဝဲဆိုတာအားလံုးလည္းသိရွိျပီးသားျဖစ္မွာပါ
အထဲမွာ Full Version ျဖစ္ေအာင္လုပ္တဲ့နည္း ဗီဒီယို လင့္ပါထည့္ေပးထားပါတယ္ခင္ဗ်ာ
အသစ္ကိုသာသံုးခ်င္ရင္ေတာ့ေအာက္မွာေဒါင္းယူလိုက္ပါေနာ္
ေဒါင္းလုပ္မလုပ္တတ္ရင္ ၾကည့္ေပးပါ >>>  How to Download

Thursday, February 26, 2015

Resident Evil Revelations 2 Ep1 ( PC Game ) Full

သူငယ္ခ်င္းတို႔အတြက္ Full PC Game ေလးျဖစ္တဲ့ Resident Evil ဂိမ္းေလးကိုတင္
ေပးလိုက္ပါတယ္။ေအာက္မွာလည္းပံုေတြနဲ႔ျပထားပါတယ္။ဖိုင္ဆိုဒ္ 3.56GB ရွိပါ
ေသာေၾကာင့္ ဖိုင္ 25 ဖိုင္ခြဲျပီး 1 ဖိုင္မွာ 150Mb ျဖင့္တင္ေပးထားပါတယ္။ေဒါင္းလို႔
ရလာတဲ့ဖိုင္ေတြကိုအားလံုးေပါင္းျပီးျဖည္လိုက္တာနဲ႔အထဲမွာ Setup.exe ေလးကို
အင္စေတာလုပ္ျပီးကစားရံဳပါပဲ။လံုး၀ကို Full စစ္စစ္ေလးပါ။


::::::::: STEMAGAMES PRESENTS :::::::::

:::: Resident Evil Revelations 2 Ep1 BoxSet MULTi11 ::::

::Information::

Year of release : 24 February 2015
Genre : Action (Survival horror) / 3D / 3rd Person
Developer : CAPCOM Co., Ltd.
Publisher : CAPCOM Co., Ltd.
Platform : PC
Version: 1.0
Publication Type : RePack
Language : English Russian, French, Italian, German, Spanish, Japanese
Korean, Polish, Brazilian Portuguese, Traditional Chinese.
Language voice : English, French, Italian, German, Spanish, Japanese.
Crack enclosing : [CODEX]

::Description::

During the party on the occasion of receiving Claire to work in the "Terra Saves" unknown armed troops burst
into the office. Forwards stun Claire Burton and Moira, who was also present at the party. Later, they both
come to mind in the dark and abandoned prison. Together, they must find out who kidnapped them and
what sinister purpose.

::System Requirements::

Operating System : Windows 7 / Windows 8 / Windows 8.1
Processor : Intel Core 2 Duo E6700, AMD Athlon X2
RAM : 2 GB
Video card : NVIDIA GeForce 8800 GTS, AMD Radeon HD 3850
Sound Card : Sound device compatible with DirectX 9
Free space on hard disk : 6.5 GB

::RePack Features::

• It is based on a licensed version of the game.
• Do not cut | Do not recoded.
• Installation time 10 minutes
• DLCs Included:
- Claire's Rodeo Costume
- Moira's Urban Ninja Costume
- Natalia's Lottie Suit Costume
- Barry's Commandant Costume
- Costume Pack
- Raid Mode Character: HUNK
- Raid Mode Character: Albert Wesker
- Raid Mode: Throwback Map Pack
- Raid Mode: Weapon Storage A
- Raid Mode: Weapon Storage B
- Raid Mode: Weapon Storage C
- Raid Mode: Parts Storage A
- Raid Mode: Parts Storage B
- Raid Mode: Parts Storage C
- Raid Mode: Album Storage A
- Raid Mode: Album Storage B
- Raid Mode: Album Storage C
• RePack by: RG Steamgames.

::INSTALL AND PLAY::


Click to Download Here (ဒီမွာႏွိပ္ေဒါင္းပါ)

★★နည္းပညာၿမိဳ႕ေတာ္★★

Sunday, February 22, 2015

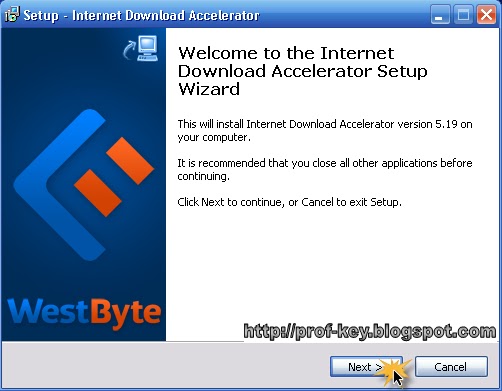
Download Speed ကို 400%ျမွင့္တင္ေဒါင္းယူနိုင္တဲ့ - Internet Download Accelerator v6.1.1.1442 + Serial ♫

imgee
Dwonload Accelerator Plus ဆိုတာကေတာ့ အင္တာနက္ေပၚမွာရွိတဲ့ မိမိလိုခ်င္တဲ့ Software , Video , Music , Application အစရွိတာေတြကို ျမန္ဆန္စြာ Download ဆြဲယူေပးႏိုင္တဲ့ Software တစ္မ်ိဳးျဖစ္ ပါတယ္။ အမ်ားကေတာ့သိၾကမွာပါ။ မသိေသးသူမ်ားအတြက္သာ ရွင္းျပျခင္းျဖစ္ပါတယ္ဗ်ာ။ IDM နဲ႕လုပ္ေဆာင္ခ်က္အတူ တူပါဘဲ။ Dwonload Accelerator Plus ကေတာ့ Internet Download Speed ကို 400% အထိျမန္ဆန္စြာေဒါင္း လုပ္ဆြဲေပးႏိုင္တယ္လို႕ဆိုထားပါတယ္။ YouTube , Facebook နဲ႕အျခားဆိုဒ္ေတြက Movies ေတြ Music မ်ား ကိုလည္း Automatically Download ဆြဲေပးႏိုင္ပါတယ္ဗ်ာ။ IDM ထက္ေကာင္းတဲ့အခ်က္ကေတာ့ လုိင္စင္ျပ သာနာမရွိပါဘူး။ IDM မွာေတာ့  ခဏခဏၾကားေနရတာ လိုင္စင္အဆင္မေျပတာပါ။ အခု Dwonload Accelerator Plus မွာေတာ့ Full Version အသံုးျပဳႏိုင္ေအာင္ Serial Key & Keygen File ထည့္သြင္းေပးထားပါတယ္ဗ်ာ။ ဒီထက္ပိုျပီးအေသးစိတ္သိခ်င္ရင္ေတာ့ေအာက္ မွာ ဆက္လက္ေလ့လာႏိုင္ပါတယ္ဗ်ာ။


Internet Download Accelerator lets you to noticeably increase the speed of file download from the Internet using HTTP, HTTPS and FTP protocols. The acceleration is achieved by splitting a file being downloaded into several parts and downloading these parts at the same time. Internet Download Accelerator resumes broken downloads from where they left off from both HTTP, HTTPS and FTP servers. To increase usability Internet Download Accelerator integrates with Internet Explorer, Firefox, Mozilla, Opera, Nescape and others, replacing the standard download modules.

Moreover, the program monitors the system clipboard and detects URLs in the clipboard. With IDA you can download and save video from popular video sharing services: YouTube, Google Video, Metacafe and others. Whatever your connection type, Internet Download Accelerator will use the bandwidth of your connection most effectively and download files extremely fast. Power and useful tool for management of download categories.Possibility of automatic file type detection with automatic file placement to the specified categories. Unlimited number of categories and hierarchy levels.

Key Features:
Easy to use:
· intuitive, user-friendly, and customizable user interface;
· download lists support with rich sorting options;
· the floating window including download speed indicator, active downloads indicators, cart for dragging links;
· original Active Visual Cart technology which lets you to work with IDA without opening the main program window;
· support for plug-ins;
· skins support;
· Fast Update - check for availability of new versions of the program;
· multilingual support.

Full set of necessary functions:
· dynamic multi-threaded download;
· resumes broken downloads from where they left off from both HTTP, HTTPS and FTP servers;
· scheduled operation, PC shutdown, sleep or stand-by after completing download;
· optimal settings for work with various connection types (dial-up, ISDN, ADSL, LAN) at various speed;
· FTP Explorer;
· support for download mirrors. Searching for and adding download mirrors;
· power and useful tool for management of download categories;
· work with ZIP archives: option to preview the contents of ZIP archives before download, option to download only files selected from an archive, option to check ZIP archives and recover corrupted files as well as option to unpack archives;
· work with RAR archives: option to check RAR archives, option to unpack archives;
· detailed log-file for every download;
· site manager for passwords and download folders management;
· download speed control, automatic mode for the most comfortable browsing on the Web. Manual mode for dynamic control of download speed;
· option to set priorities for downloads;
· possibility to download html-pages with images;
· download entire folders (including subfolders) via FTP;
· content recognition when working through HTTP;
· work with command-line;
· dial for dial-up connection;
· search for files, programs, archives and documents in IDATop.com file catalog;
· Smart Pause/Start. Ability to temporarily stop current downloads with option to start them later in the same order and state;
· rich options of tuning connection parameters HTTP, HTTPS and FTP;
· work behind HTTP and FTP proxy-servers, support for NTLM and NTLM-proxy authentication. IDA can automatically detect and use your browser's proxy-server settings;
· support for FTP over SSL/TSL;
· option to play streaming audio and video files while they are being downloaded. Automatic receipt of information about MP3 files when starting download;
· downloads history;
· option of dragging selected text from browser or another program onto the floating window. IDA will find links in the text and offer you to start download;
· ability to drag download description text from another programs. Automatic insertion of the text selected on a page opened in IE into the download description.
· search in the download list;
· option of automatic synchronization of files on servers and your computer (autoupdate);
· checking downloaded files for updates (manually or automatically);
· marking downloaded files as unread;
· wide download list export/import options. Supported formats: .txt, .txtd, .lst, .urls, .ion.

Highest download speed:
· intellectual multi-section download. Internet Download Accelerator dynamically splits a file being downloaded into several sections and downloads all the sections at the same time. It increases the speed of download up to 500%;
· automatically restarts download when download speed decreases which helps to avoid stoppage;
· download speed control with automatic mode making web-surfing more comfortable.

OS : Microsoft© Windows 8/7/Vista/XP/2012/2008/2003/2000/NT
<<< ေအာက္မွာ Click တစ္ခ်က္ေလာက္ႏွိပ္ေပးျခင္းအားျဖင့္ တစ္ဖက္တစ္လမ္းကကူညီရာေရာက္ပါတယ္။ >>>


img1

 img2

img3

 img4

 img2

**  Step-1.ေအာက္က Download Button ကိုႏွိပ္လိုက္ပါ
**  Step-2. "5sec". ေလာက္ေစာင္႕ေပးပါ။

**  Step-3. "  << SKIP AD >>   ".ကိုႏွိပ္ေပးပါ။
**  Step-4. Download Link က်လာပါလိမ္႕မယ္။
**  အဆင္ေျပပါေစဗ်ာ။

   Download

Saturday, February 21, 2015

အရိုးရွင္းဆံုး Windows 7 တင္နည္း

အရိုးရွင္းဆံုး Windows 7 တင္နည္း

မဂၤလာပါ
ဒီေန႔ေတာ့ Windows 7 တင္နည္းကို အားလံုးအတြက္ တင္ေပးလိုက္ပါတယ္။
Windows တစ္ခုကို စတင္ၿပီး Install လုပ္ေတာ့မယ္ဆိုရင္ေတာ့ Windows 7 ကိုတင္ယူႏိုင္ဖို႔ရန္အတြက္
Requirement ေခၚတဲ့ အခ်က္အလက္နဲ႔ ျပည့္စံုပါမွ Windows ကိုအဆင္ေျပေျပ တင္ယူႏိုင္မွာျဖစ္ပါတယ္။
Windows 7 ကိုတင္ဖိုရန္ လိုအပ္ခ်က္ေတြကေတာ့ ေအာက္ပါအတိုင္းျဖစ္ပါတယ္။
Windows 7 system requirements
===================
1 gigahertz (GHz) or faster 32-bit (x86) or 64-bit (x64) processor
1 gigabyte (GB) RAM (32-bit) or 2 GB RAM (64-bit)
16 GB available hard disk space (32-bit) or 20 GB (64-bit)
DirectX 9 graphics device with WDDM 1.0 or higher driver
ျမန္မာလိုေတာ့ ရွင္းျပေနစရာမလိုေလာက္ေတာ့ဖူးလို႔ထင္ပါတယ္။  
 စာကိုျမင္တာနဲ႔သေဘာေပါက္ေလာက္မွာပါ၊ တကယ္လို႔မိမိကြန္ပ်ဴတာက အထက္ပါ လိုအပ္ခ်က္ေတြနဲ႔ ျပည့္စံုေနတယ္ဆိုရင္ေတာ့ Windows 7 တစ္ခုကို အရိုးရွင္းဆံုးနည္းကို ေအာက္မွာ ဆက္ေလ့လာၾကည့္ရေအာင္ပါ။
Windows တစ္ခုကို Install စတင္လုပ္ေဆာင္ေတာ့မယ္ဆိုရင္ေတာ့ သင့္မွာ ၀င္းဒိုးအေခြ DVD တစ္ခ်ပ္ေတာ့ လိုအပ္ပါမယ္။ အားလံုးအသင့္ျဖစ္ရင္ေတာ့ ကြန္ပ်ဴတာရဲ့ Power ကိုစတင္ဖြင့္လိုက္ပါ။
Delete Key ကိုႏွိပ္ထားပါ၊ အခ်ိဳ႕ေသာ ကြန္ပ်ဴတာတိုု႔တြင္ F2 Key ကိုႏွိပ္ေပးထားပါ။ ေသခ်ာေစရန္ CMOS Setup ေပၚလာသည္အထိ ေလး ငါးခါ ေလာက္ ဆက္တိုက္ႏွိပ္ထားေပးပါ။
Windows 7 DVD အေခြကိုထည့္လိုက္ပါ။
Advanced BIOS Features ဆိုတာကိုႏွိပ္ပါ အနီေရာင္နဲ႔၀ိုင္းျပထားပါတယ္။
First Boot Device OR Boot sequence ဆိုတာကို ရွာၿပီး
First Boot ေနရာမွာ CDROM ထားပါ။ Second Boot ေနရာမွာ Harddisk OR HDD-0 ကိုထားပါ။
ၿပီးလွ်င္ F10 Key ကိုႏွိပ္၊ Yes OR Enter Key ကိုႏွိပ္ေပးလိုက္ပါ။

စက္က Restart က်သလို က်သြားပါလိမ့္မယ္ ေစာင့္ေနပါ၊ စက္ျပန္တက္လာတဲ့အခါ၊

Press any key to boot from DC or DVD……

ဆိုၿပီးစာေၾကာင္းအျဖဴေရာင္ေလးနဲ႔ေပၚလာခဲ့ရင္ေတာ့ Enter Key ကုိႏွိပ္ေပးလို္က္ပါ။


Windows Files မ်ားကို ကူးယူေနတုန္းေလး ေခတၱေစာင့္ေနလုိက္ပါ။
Starting Windows ဆိုၿပီးေအာက္ကပံုအတိုင္းျမင္ေနရရင္ေတာ့ ခနေလးေစာင့္ေနလိုက္ပါ

Install Windows ဆိုၿပီးေပၚလာတဲ့အခါ ဘာမွထပ္ေရြးေပးစရာမလိုေတာ့ပါ Next ကိုႏွိပ္လိုက္ပါ။

ေအာက္ကပံုအတိုင္းေပၚလာခဲ့ရင္ေတာ့ Install Now ဆိုတာကိုႏွိပ္ေပးလိုက္ပါ။


Setup is starting ဆိုၿပီး ေအာက္ကပံုအတိုင္းေပၚလာခဲ့ရင္ေတာ့
 ခနေလးေစာင့္ေနလိုက္ပါ


မိနစ္အနည္းနယ္ၾကာၿပီးလို႔ ေအာက္ကပံုအတိုင္းေပၚလာခဲ့ရင္ေတာ့ Operating System OS ကိုေရြးေပးရမွာျဖစ္ပါတယ္၊ ဒါကေတာ့ က်ေနာ့္ Windwos DVD ေခြက All in One အမိ်ဳးအစားျဖစ္ေနလို႔ Operating System မ်ားေနတာပါ။ မိမိအသံုးျပဳလိုတဲ့ Windows Operating System ကိုေရြးေပးရမွာျဖစ္ပါတယ္၊ အခုက်ေနာ္ကေတာ့ Windows 7 Ultimate x86 ကိုေရြးေပးလိုက္ပါတယ္။


ေအာက္ကပံုအတုိင္း ျမင္ေနရရင္ေတာ့ I accept the license terms ဆိုတဲ့
 ေလးေထာင့္ကြက္ေလးကို အမွန္ျခစ္ေလးေပးပါ၊ ၿပီးရင္ Next ကိုႏွိပ္ေပးလိုက္ပါ။


Windows အသစ္တင္ယူမွာျဖစ္လို႔ Custom (Advanced) ဆိုတာကိုေရြးေပးလိုက္ပါ။


Custom (Advanced) ေရြးၿပီးလို႔ ေအာက္ကပံုအတိုင္းေပၚလာခဲ့ရင္ေတာ့ တကယ္လို႔ သင့္ကြန္ပ်ဴတာမွာ
Partation ေတြမ်ားေနခဲ့ရင္ေတာ့ မိမိ Windwos တင္လို႔ Harddisk Partation ကိုေရြးေပးရမွာျဖစ္ပါတယ္။ က်ေနာ္မွာေတာ့ Partation တစ္ခုတည္းပဲ ျဖစ္ေနလို႔ Next ကိုပဲႏွိပ္ေပးလိုက္ပါတယ္။


တကယ္လို႔ ၀င္ဒိုးကအရင္သံုးလက္စ အေဟာင္းရွိေနေသးတာတို႔ဆိုရင္ပဲျဖစ္ျဖစ္ အေၾကာင္းအမိ်ဳးမ်ိဳးေၾကာင့္ Windows အေဟာင္းကို Format ခ်လိုတာတို႔ Delete လုပ္လိုတာတို႔ဆိုရင္ေတာ့  Drive Option (Advanced) ဆိုတာကို ႏွိပ္ၿပီး Format ခ်ယူႏိုင္ပါတယ္။


Windows Files မ်ားကို Install ျပဳလုပ္ေနတုန္း ခနေစာင့္ေနပါ၊ Copying Windows files ကေန Completing installation အထိ %0 to %100 အထိေစာင့္ေနရပါမယ္ ဘာမွလုပ္ေပးစရာမလိုပါ။


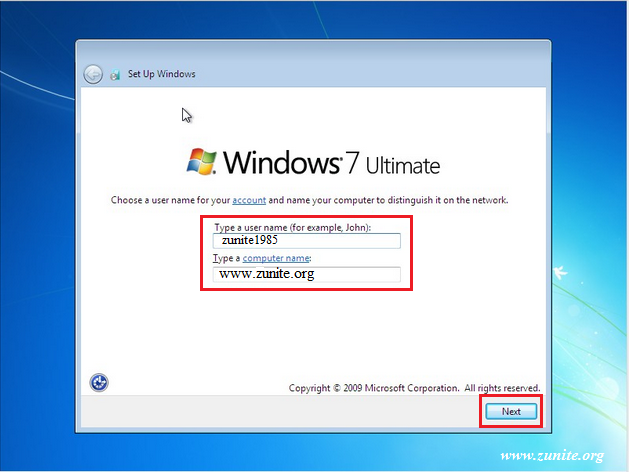
Windows dialogue box က်လာၿပီးရင္ေတာ့ User name ေနရာမွာ မိမိနာမည္ကိုထည့္ပါ၊ 
Computer name ေနရာမွာေတာ့ မိမိကြန္ပ်ဴတာကို ထားလိုေသာနာမည္တစ္ခုခုကို
 ေရးထည့္ေပးလိုက္ပါ။ ၿပီးရင္ Next ကိုႏွိပ္လိုက္ပါ။


Password ထားၿပီးအသံုးျပဳလိုက ျဖည့္ေပးလိုက္ပါ။ ဒီေနရာမွာလည္း Password ေနရာမွာ မိမိထားလိုေသာ Password ကိုထားေပးပါ၊ ဥပမာ-Zunite (CEO) စသည္ေပါ့၊ စာလံုးအႀကီးအေသးအကုန္ရပါတယ္။
 Retype your password ဆိုတဲ့ေနရာမွာလည္း ေစာနားက Password ေနရာမွာထည့္ထားခဲ့တဲ့ Password ကိုထပ္ထည့္ေပးလိုက္ပါ။ Type password hint (required) ေနရာမွာေတာ့ အေပၚက မိမိထားခဲ့တဲ့ Password မတူတဲ့ နံပါတ္တစ္ခုခုျဖစ္ျဖစ္ စာပဲျဖစ္ျဖစ္ တစ္ခုခုကိုေရးရမွာျဖစ္ပါတယ္။ 
ေရးၿပီးလည္းအဲဒီ Hint password ကုိအေသခ်ာမွတ္ထားေပးလိုက္ပါ။ တယ္ကယ္လုိ႔ မိမိက password ကိုေမ့လို႔ ဖြင့္မရေတာ့တဲ့အခါ ေစာနားက hint လုပ္ထားတဲ့ Password ကိုျပန္ထည့္ေပးႏိုင္ရင္ ကြန္ပ်ဴတာ Lock ကိုေကာင္းေကာင္း ေျဖယူႏိုင္ပါတယ္။ ၿပီးရင္ Next ကုိႏွိပ္ပါ။
ထည့္ၿပီး အသံုးမျပဳလိုေသးဘူးဆိုရင္လည္း Next ကုိႏွိပ္ေပးလိုက္ပါ။


License agreement ျဖင့္၀ယ္ထားေသာ Windows မဟုတ္လွ်င္ေတာ့ Product Key ကိုမထည့္ပဲ automatically activate Windows when I’m online မွာရွိတဲ့ ေလးေထာာင့္ကြက္ေလးမွ အမွန္ျခစ္ေလးကိုျဖဳတ္ေပးၿပီး Next ကိုသာႏွိပ္ေပးလိုက္ပါ။


အဆင့္ေတြေက်ာ္လာခဲ့လို႔ ေအာက္ကပံုအတိုင္းျမင္ေနရရင္ေတာ့
 Ask me later ဆိုတာကိုေရြးေပးလိုက္ပါ။

Time zone ေရြးခိုင္းတဲ့ေနရာမွာေတာ့ မိမိေနတဲ့ ႏိုင္ငံရဲ့ Provide ကိုေရြးလိုက္ပါ။


Windows ကို Install လုပ္ေနတုန္း သင့္မွာ Internet Connection သာအသင့္ရွိေနၿပီး တစ္ခါတည္း Connected လုပ္ၿပီး Install လုပ္ယူသြားခ်င္တယ္ဆိုရင္ Wifi ရဲ့ လွ်ိဳ႕၀ွက္ခ်က္ ကုတ္နံပါတ္ကိုထည့္ေပးၿပီး မိမိအသံုးျပဳမယ့္ Network အမိ်ဳးအစားကို ေရြးေပးလိုက္ပါ။
Router အမိ်ဳးအစားသံုးတဲ့ သူေတြအထူးသျဖင့္ 10 User Or Group User အေနျဖင့္အသံုးျပဳေနၾကတဲ့ သူေတြကေတာ့ အေပၚဆံုး Home Network ကိုေရြးခ်ယ္ေပးလိုက္ပါ။


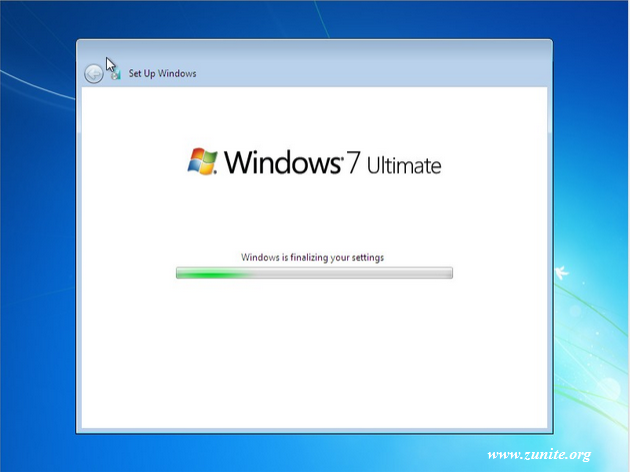
အားလံုးၿပီးလို႔ Windows is finalizing your setting ဆိုၿပီး ေအာက္ကပံုအတိုင္းေပၚေနရင္ေတာ့ ခနေစာင့္ေနလိုက္ပါ ကြန္ပ်ဴတာရဲ့ Desktop Screen ႀကီးေပၚလာသည္အထိေစာင့္ေနလိုက္ပါ။


Congratulations ေပါ့ဗ်ာ အေပၚကအဆင့္ေတြကို ေအာင္ျမင္စြာေက်ာ္ျဖတ္ခဲ့ၿပီးျဖစ္လို႔ 
Windows 7 Ultimate တင္ျခင္းကိစၥ ေအာင္ျမင္စြာၿပီးဆံုးပါၿပီ။


PDF စာအုပ္ အျဖစ္ သိမ္းဆည္းထားခ်င္တဲ့ ေဘာ္ဒါေတြကေတာ့
ေအာက္ကလင့္မွာေဒါင္းေလာ့ရယူလိုက္ပါ။

Download Here 

OR

Download Here

OR

Download Here 

OR

 Download Here

OR

Download Here

Windows 8 တင္နည္းကိုေတာ့ ေအာက္ကလင့္မွာ
ေဒါင္းေလာ့ရယူလိုက္ပါ

အရိုးရွင္းဆံုး Windows 8 တင္နည္း (ျမန္မာလို စာအုပ္)

Windows 10 တင္နည္းကိုေတာ့ ေအာက္ကလင့္မွာ
ေဒါင္းေလာ့ရယူလိုက္ပါ

Windows 10 Technical Preview Pro Edition & Enterprise Edition ဗားရွင္းအားလံုးကို အလြယ္တကူ Windows တင္နည္း  

အားလံုးပဲ အဆင္ေျပၾကလိမ့္မယ္လို႔ေမွ်ာ္လင့္ပါတယ္
အားလံုးကို ခင္မင္ေလးစားလွ်က္
   

အဆင္ေျပပါေစ
ဇူးနစ္(နည္းပညာ)
 www.zunite.org

FB ခ်စ္ပရိတ္သတ္ႀကီးမ်ားခင္ဗ်ား ဇူးနစ္(နည္းပညာ) ဆိုက္မွာ ဖုန္းေဆာ့၀ဲ ဂိမ္းမ်ား သတင္းစေသာ အသစ္ကေလးမ်ားကို အခ်ိန္နဲ႔တစ္ေျပးညီ တင္ေပးေနတာမို႔ FB Page ေလးကို  LIKE ေပးၿပီး အားေပးႏိုင္ပါတယ္။(အားလံုးကို ေက်းဇူးတင္ပါတယ္)

  Download Here
Related Posts Plugin for WordPress, Blogger...